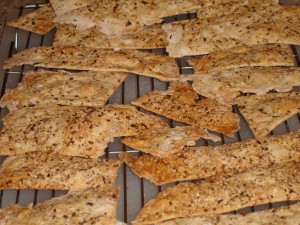
This is a recipe from Fine Cooking, December 2007 and it’s one I will be making for Galatea’s Holiday Open House December 4th (http://on.fb.me/9NIyvj). It’s so easy your kids can help you and it’s flexible enough to change for whatever cheese or spread you plan to use. The beauty of this dough is that you can refrigerate it for up to 2 days or freeze it for a month. After the crackers are baked they hold very well for a solid week in an air-tight container. They are lovely as a gift with some local chevre mixed with fresh herbs.
Ingredients for Dough:
- 1 1/2 cups (6.75 oz) unbleached all-purpose flour with a bit extra for rolling
- 2 oz whole-wheat flour
- 1 teaspoon salt
- 3 tablespoons extra-virgin olive oil
Ingredients for Topping:
- 1 tablespoon sesame seeds
- 2 teaspoons poppy seeds
- 1-2 teaspoon caraway seeds
- 3/4 teaspoon kosher salt (or other large grain salt)
- 2 tablespoons fresh chopped rosemary (optional)
- 1 teaspoon roasted chopped garlic (optional)
Directions:
- Preheat the oven to 450F with rack in the lower third of the oven.
- Make the topping and set aside.
- Fill a separate small bowl with cold water and set aside a pastry brush.
- In a large bowl, whisk together the all-purpose flour, whole-wheat flour and table salt. Add the olive oil and 1/2 cup water to the flour. Stir with a rubber spatula until it collects in a soft, crumbly ball of dough. Use the spatula or your hands (I find using vinyl gloves are useful with this recipe) to press the dough together and gather all the stray flour in the bowl.
- Set the dough aside on a lightly floured work surface and portion it into thirds. I normally just leave these as balls and set aside with a clean damp towel over them. I have found that using some parchment paper under the dough I am rolling is helpful later in the process for transferring the dough to the baking sheet. Roll the remaining dough into a rectangle about 1/16″ thick and 7-8 inches wide by 14-15 inches long. Whenever you feel resistance, lift up one edge of the dough and sprinkle more flour underneath before you continue to roll this out. The thinner the dough, the crisper they will be. However, if they are too thin, they will break when you try to add anything to them. It’s pretty easy to tell if they are too thin when you transfer the pieces to the baking sheet. You won’t be able to transfer them properly if the dough is rolled too thin.
- With the pastry brush, lightly dab the dough with water and sprinkle about 1/3 of the seed/herb mix onto the top of the dough evenly and about 1/4 of the larger grain salt. I find lightly pressing all of this into the dough at this point is helpful in keeping it on after this bakes. You can also use a very small rolling pin (like the kind you use for Asian dumplings) to press the mixture into the dough.
- Using whatever tool you want (pizza cutter, dough scraper, ravioli cutter or sharp knife) cut the dough in half lengthwise and then cut across to make rectangular pieces that are about 2″wide x 4″ long. You will have rough edges on some of these. Don’t worry about it as they look great once they are baked. Transfer these pieces to an unlined baking sheet and bake until nicely browned which takes about 10 minutes. These require a watchful eye. They will be under-baked and not crispy if they do not brown, but they also go from perfectly browned to burned in a matter of a minute or two. Remove them from the baking sheet and cool them on a wire rack.
- Continue the process until you are finished with each ball of dough. Cool everything completely before storing in an airtight container.


