Late Summer Melon Coolers

The unusually wet summer here produced a huge volume of mosquitoes and melons all at once despite farmers separating their plantings by weeks. This year one of my favorite new melons was the Yellow Summer Doll Watermelon. It is incredibly sweet like most watermelons but the color after it’s blended into a drink is what makes it the most fun to make and the few seeds that there are seemed to be concentrated in areas when you make the cuts on the melon.

All of these melons have slight variations on the amount of lime you will need to use. It really depends on the sweetness and intensity of the year’s crop and your desire for a bit of contrast provided by the lime. This recipe was tested on cantaloupe, pink & yellow watermelons.


Late Summer Coolers

Ingredients

  • 8 cups of cubed Cantaloupe or Watermelon without seeds
  • 1/4 cup lime juice

Preparation

  • Using a bar blender, fill your blender with 1-2″ chunks of melon, minus the seeds if you’re using watermelon.
  • Add about 1/4 cup of lime juice or a little less if you are timid about the flavor.
  • Blend until it’s all smooth.
  • Refrigerate and serve over ice topped with a sprig of mint or lemon verbena.

Notes

This doesn’t need any sweetener.  And if you strain it like many recipes call for, it becomes thin and you lose about 1/2 of the volume which is not very economical. Blending ice into it just makes the flavor too thin. If you chill before serving the ice won’t melt as quickly and you’ll get the full flavor coming through. I think you could freeze this into a slushy drink as well if you have kids and send it in their lunch box. And it’s possible to freeze melon in the raw so you could have these drinks on unusually warm fall or early spring days or for a summer themed party in the middle of winter.

Posted in Dairy-Free, Drinks, Gluten-Free, Nut-Free, Recipes, Seasonal Eating, Summer, Year-Round | Tagged , , , , , , , , , , , , , , , , , , , , , , | Leave a comment

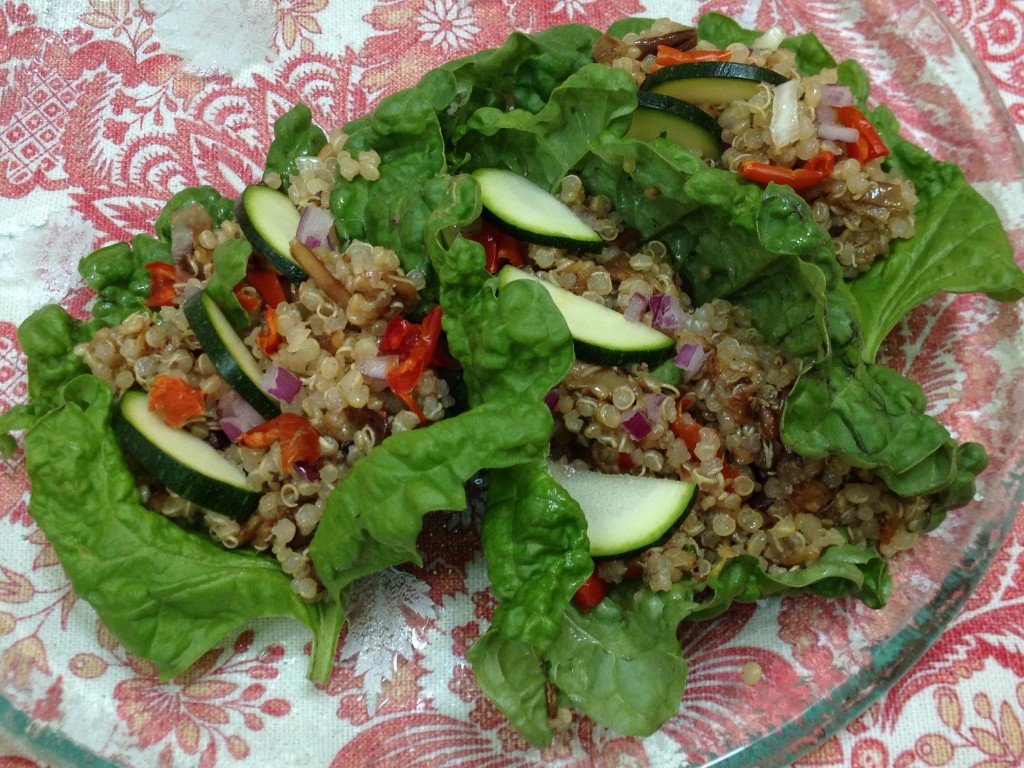
Spicy Quinoa Salad with Grilled Eggplant & Tuscan Basil

Given the outrageous hot weather this month, nobody wants to “cook”.  So market demonstrations become a bit challenging unless you’re bringing something with “ice” in the name.

Quinoa is one of those great bases that can be served hot, cold or at room temperature and it tastes great. Really it doesn’t taste like much at all, which is the beauty of it. Just a little nutty, a little crunch factor, small, light, and blends with almost everything. So that’s where this salad starts. That and a gift bag of Tuscan Basil from Eastern Carolina Organics, which turned out to be quite useful. When I originally made this salad, it was more of a spicy filling that I wrapped into the large basil leaves. They are thin but very strong and reminded me of stuffed grape leaves. It only took a bite or two to finish off each little parcel and the basil was never bruised in the process, so it didn’t turn brown or bitter even after a couple of hours of shooting photos and playing around with the salad.

This is clearly a seasonal salad but I had one thing out of season that I’ve enjoyed using since I picked it up from the Carrboro Farmers Market last fall. Dried hot peppers. They’ve been put in a ton of recipes this year, sometimes with surprising results, like the maple syrup dressing. I was concerned about adding them to this and then taking it to a market, but everyone seemed to really enjoy them. You do need to be careful how much you use because they vary in heat from pepper to pepper.

You can adapt this recipe throughout the summer but I’ve written the directions for the mid to late summer veggies. The eggplant was leftover from another meal where I had grilled slices and no one realized it was in there because it’s so mild and smokey when you grill it. You could add a bit of chicken or white fish to this as well, especially if you choose to use the large Tuscan Basil leaves as a green wrapper instead of shredding it into the salad as I did for the farmers’ market.


Spicy Quinoa Salad with Grilled Eggplant & Tuscan Basil

Ingredients

  • 1 cup dry quinoa  (any color)
  • 1 cup filtered water
  • 1/2 teaspoon Himalayan salt
  • 1/8 teaspoon ground pepper (Savory Spice Mesquite Apple Wood Smoked Peppercorns recommended)
  • 1 small green zucchini, sliced thinly and quartered
  • 1/2 -1  dried Asian pepper, very finely chopped (use with care)
  • 1 tablespoon sweet red onion, finely chopped (can substitute baby leeks or green onion)
  • 2 tablespoons fresh sweet red peppers or paprika peppers
  • 1/2 cup sliced roasted “Rosa” eggplant, cooled and lightly chopped
  • 1 teaspoon extra virgin olive oil
  • 6-8 medium – large leaves of Tuscan Basil pulled at the stem

Preparation

  • Rinse the quinoa in 3 flushes of water, making sure to rub it around to shed the outside hull which is bitter when cooked.
  • Add to rice cooker or glass baking dish with 1 cup filtered water,  1/2 teaspoon salt, 1/8 teaspoon pepper, and 1 teaspoon olive oil. Set the rice cooker to “white rice” setting or cover and bake at 350F until the quinoa has absorbed all of the water (about 20-30 minutes). Set aside to cool when it’s finished.
  • Gently was and dry the Tuscan Basil and set aside. Arugula works well as a substitute if you don’t like basil.
  • Blend the finely chopped onion, red peppers, hot peppers with the quinoa and olive oil.
  • Lightly salt & pepper the zucchini and chopped eggplant slices and then gently mix with the quinoa.
  • Fill each basil or arugula leaf with the mixture and eat. Alternatively, shred the greens and blend them into the quinoa for a salad or stuffing for a roasted pepper or tomato.
Posted in Appetizer, Dairy-Free, Diabetic Friendly, Dinner, Gluten-Free, Recipes, Salads, Seasonal Eating, Second Harvest, Sides, Summer, Vegetarian | Tagged , , , , , , , , , , , , , , , , , , , , , | Leave a comment

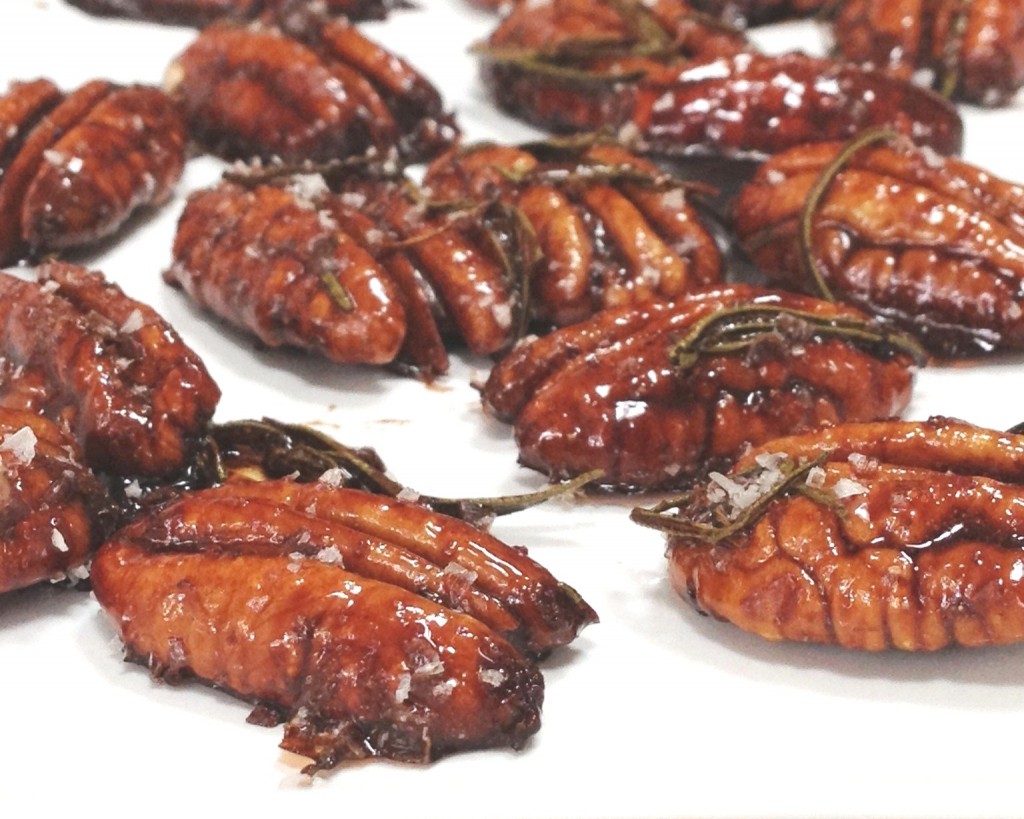
Pecans with Raspberry Vinegar, Honey & Rosemary

I know this sounds like an odd recipe, but I was thinking about how much I enjoyed the Strawberry Balsamic & Pepper Jam and I’ve been trying to get time to develop some recipes using a raspberry vinegar that the fine folks from Olio2Go shipped to me with my last olive oil order. It’s been great using it in dressing for the quinoa and green salads, but I really wanted to find more interesting uses for it.

A couple of weeks ago Savory Spice Shop got in some Mesquite & Apple Wood  Smoked Peppercorns. Being a huge fan of the smoked salts they carry, I thought this delightfully complex peppercorn might be pretty interesting with the vinegar. Knowing that you have to balance the acid with a sweet, well there’s no way I’m going to pass up the three honey jars sitting on the counter from Just Bee Apiary. You can see where this is going by now… Not two but three birds with one stone. And of course we’re going to need a salt so I decided something bright would be a nice contrast, so I went with the Murray River Flake Salt.

Well it’s been a good day. This recipe came together in less than an hour. The problem was it tasted so good that I ate the entire first batch and had to repeat it to get photos. Gosh darn, what a shame. The only downside to the day was the sun went away about the time I finished making the second test batch. So I guess I’ll have to make them again on another sunny day and you’ll have to suffer through the photos that I was able to take today.

I’ve put the appropriate links into the recipe for the products I used. You can substitute others that are local to you. My only comments are these. The smoked pepper and flake salt make a difference in how you taste the sweet and tart of the recipe. The honey you select should not be commercial and should be medium to deep colored with full flavors. Lighter honey will add sweetness, but this is such a simple recipe that you really need the honey to add some additional flavor from whatever the bees are busy eating. We won’t go into the process of how honey is made.

Don’t skip the (toaster) oven part on the recipe. That is what will crisp up the rosemary so it’s crunchy when you eat the pecan. A little contrast in texture. These are still a little sticky and I think on a salad they would be wonderful, but on their own or with some young brie or something like Chapel Hill Creamery’s New Moon or slices of Hickory Grove as a contrast, you might just be able to make it a light dinner with a beverage of your choice.


Smoked Pepper Pecans with Raspberry Vinegar & Fresh Rosemary

Ingredients

Preparation

  • Put all of the ingredients except the salt into a small stainless pot. Do not use aluminum or cast iron with the vinegar.
  • Bring to a low simmer on medium heat and stir for about 5 minutes to keep the pecans coated.
  • As the mixture reduces and thickens be careful not to let it burn. Adjust the heat as needed.
  • Transfer the coated pecans to a baking sheet lined with parchment paper and carefully sprinkle with the flake salt so it sticks to the tops of the pecans. Toast for about 3-4 minutes in a toaster oven or bake at 375F for up to 5 minutes until the rosemary appears to get crispy. Do not let the rosemary or the honey in the recipe burn.
  • Let the pecans cool for 10 minutes before serving. Store in an airtight container for up to a week.


Posted in Appetizer, Dairy-Free, Gluten-Free, Recipes, Snack, Vegetarian, Year-Round | Tagged , , , , , , , , , , , , , , , , , , , , , , | Leave a comment

Roasted Potato Salad with Buttermilk & Yogurt Herb Dressing

I’m a firm believer in reducing the number of times I turn on the oven inside the house once our temperatures start to hit 80+. But I’m not against using the grill to roast off staples like fresh dug potatoes. While potatoes keep pretty well, you really need cool dark dry storage. Not an easy thing to achieve in the South. So I opt for cooking them right away with fat. Olive Oil to be exact, along with some good salt & fine ground pepper. And then I freeze them. It’s no wonder the local farmers have taken to calling me the “freezer queen”. Laugh as you may, you won’t when you have my Roasted Potato & Summer Corn Chowder or Potato & Roast Beef Hash in the middle of winter with a couple of eggs on top for breakfast. So go ahead and buy a few extra pounds of some of those beautiful potatoes you have spotted in the market. Support your local farmers and take them some leftover soup in the middle of winter to show your appreciation for all the work they do during the main growing season.

Roast all of your potatoes using the technique in this recipe and then freeze them in containers with between a pound – two in each container depending on your family size or recipes on file.  You’ll take half the time to prepare your recipes in the middle of winter when daylight hours are scarce and your energy is lower. Use more or less herbs depending on your preference for each batch. I happen to really like the flavor of fresh herbs so I use quite a bit of the fresh ones from my garden for our home supply. If you don’t like herbs, cut back and if you don’t have access to fresh herbs, I generally use an Italian blend from Savory Spice or Frontier in a pinch.

If you like vinegar on your french fries (those of you that have been to the boardwalk at Ocean City, Maryland), you can achieve a healthy version of those fries by adding just a teaspoon of Apple Cider Vinegar or malted vinegar to about 1 lb of your roasted potatoes as they exit the oven. They will absorb the vinegar quickly and you can adjust your salt at that point as well, using anything from a Chardonnay Oak Barrel Salt to Murray River Flake Salt. One is a little more like fall, one like spring or summer. Eat them warm or at room temperature. Warm, they will still be crispy from the oven roasting.

But with this recipe for potato salad, if you’re tempted to add the vinegar, don’t. I’ve tried it and it  competes too much with the buttermilk dressing, fresh herbs and olive oil undertones. This is a subtle side dish and it’s not meant to pucker your mouth, just complement your other food. The fresh herbs, good quality salt & pepper all stand on their own in the dressing just fine without vinegar.


Roasted Potato Salad with Buttermilk & Yogurt Herb Dressing

Ingredients

  • 2 lbs freshly dug Corolla or Yukon Potatoes (not too large)
  • 1/2 teaspoon Himalayan salt
  • 1/4 teaspoon fresh ground mixed pepper blend
  • 1 tablespoon olive oil
  • 1/2 cup chopped heirloom celery
  •  2 tablespoons organic buttermilk (without thickening agents)
  • 1/4 cup organic Greek yogurt
  • 2  teaspoon fresh chopped thyme leaves
  • 1 /2 teaspoons fresh chopped rosemary leaves
  • 1/4-1/2 teaspoon fresh garlic or garlic scapes finely chopped (optional)
  • 1 tablespoon chopped flat leaf parsley
  • 2 teaspoons fresh chives, finely chopped
  • 1 hard-boiled farm egg, rough chopped
  • pinch of celery salt (optional)


Preparation

  • Scrub your potatoes well. I tend to use smaller potatoes and leave the skin on them. It’s generally thin and crisps up nicely when it’s roasting. Cut the potatoes into bite size pieces.
  • Spread on a heavy baking sheet that’s been lined with parchment paper.
  • Sprinkle the potatoes with olive oil, salt, pepper, and half of thyme and rosemary. Toss to coat well.
  • Cover the pan with aluminum foil and bake at 400F for about 20 minutes. Uncover and bake an additional 10 minutes to crisp the potatoes. Keep an eye on them. Remove and let them cool completely.
  • Chop your celery into small pieces. (larger if you prefer it that way)
  • Mix yogurt, buttermilk and the other half of the thyme, rosemary, parsley, chives, garlic and celery together and blend with the cooled potatoes. Gently toss in the chopped hard-boiled egg.
  • Let sit at least 1/2 hour in the refrigerator before serving.

Notes

If you don’t plan to dress your potatoes in some way there are a couple of other options during the roasting process. You can change the salt and pepper blend.

  • Savory Spice Shop has a Piment d’Espelette Grey Sea Salt that is excellent on the potatoes along with a little extra Espelette Chili Pepper which is on the light side of the heat scale. Using those two items with olive oil will and combining with some extra roasted onions will provide you with a back drop for breakfast potatoes that pair well with eggs.
  • If you plan to use the roasted potatoes with meat or poultry, Savory Spice Shop has a Chardonnay Oak Barrel Salt that is one of their lightest smoked salts and the subtle nature of it pairs well with mushrooms, onions, and summer peppers for a dairy free potato salad using olive oil.


Posted in Fall, General, Gluten-Free, Lunch, Recipes, Salads, Seasonal Eating, Sides, Summer | Tagged , , , , , , , , , , , , , , , , , , , , | Leave a comment

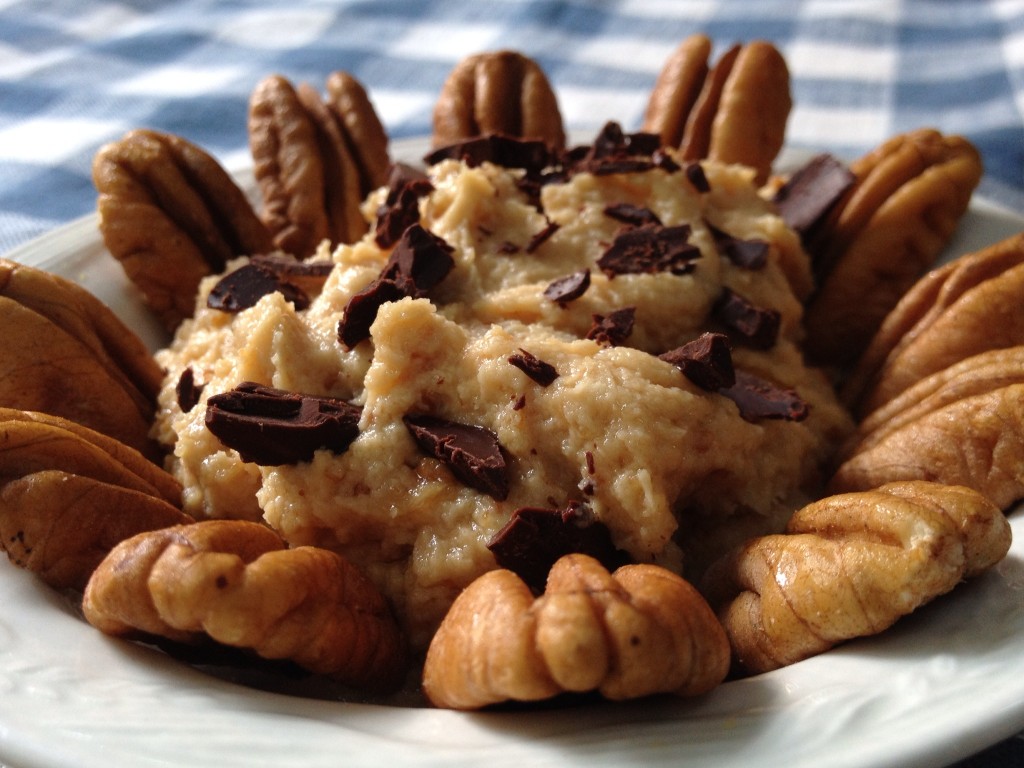
Peanut Butter, Chevre & Pecans with Dark Chocolate

What caught your attention? The peanut butter & goat cheese or the Dark Chocolate? I have to be honest that this recipe was inspired by a visit this past Saturday to the South Durham Farmers’ Market where Laurie & I spent some time talking with Prodigal Farm‘s owner Kat Spann along with some other farm owners that we had not met before. I’m a big fan of Prodigal’s goat cheesecakes, particularly the lemon with raspberry topping. I’m really glad they make a small version of it that I can normally portion out for 2 or 3 days.

I’m also a fan of Foster’s Peanut Butter Pie, which is significantly less healthy and creates a bit of sugar rush in my body so I don’t get it often and always look for a sharing partner given the size of the piece they dish out at the market store.

So I was a bit intrigued to see if there were recipes that might combine the healthier benefits of the goat cheesecake and the peanut butter pie decadence that I enjoy. Having recently secured some additional Big Spoon Roasters Peanut Butter there’s plenty to play with around the kitchen.

Sure enough recipes abound on the internet for goat cheese and peanut butter pie and we’ve already got some ideas on how to make this into a gluten-free yummy tasting recipe but in the meantime, here’s a quick dip that you can put together and serve over the summer, even on a picnic and keep your guests guessing as to the ingredient list. And if you are inclined, I believe you could make a chocolate half shell and create a sort of buckeye ball dessert truffle. Yum. Bring me one if you do, please.

Keep it chilled until you are ready to serve and then pull it out just 10 min or so before serving so it comes closer to room temperature and the texture becomes more creamy. You can adjust the sweetness really easily by adjusting the honey. And since honey can vary by region, be sure to select one for this recipe that has a bit of body and substance to it.  And don’t skip the dark chocolate. The bittersweet nature of it contrasts well to the light sweet honey and it melts well in your mouth. If you’re not a fan of chocolate, just leave it out, this recipe would be good as truffles rolled in toasted pecans as well if you are a fan of those we already produce for our delivery / catering business.


Peanut Butter & Goat Cheese with Toasted Pecans & Dark Chocolate

Ingredients

  • 1/2 cup fresh goat cheese
  • 1/4 cup fresh peanut butter (Big Spoon Roasters plain works well)
  • 2-4 teaspoons local honey (Chatham County Blend from Just Bee Apiaries & Woodleaf Honey from Louisburg both work well)
  • 2 teaspoons chopped 74-85% dark chocolate bar
  • 1/2-1 cup toasted pecan halves

Preparation

  • Mix the peanut butter, goat cheese and the least amount of honey together with a butter knife or cheese spreader until it’s well blended.
  • Taste to see if it is to you sweetness level. Add more honey as necessary. Each local honey has a different flavor and sweetness level so this will vary. (Big Spoon Roasters uses some honey in their nut butter already)
  • After you have sweetened the mixture to your taste, gently fold the chocolate pieces into the mixture or just sprinkle on top and chill.
  • Serve with the toasted pecans around the spread or in a separate bowl. If you prefer truffles, wait until the spread is chilled and quickly work it into little balls and roll in chopped toasted pecans and re-chill before serving.
Posted in Dessert, Fall, General, Gluten-Free, Recipes, Seasonal Eating, Snack, Spring, Summer | Tagged , , , , , , , , , , , , , , , , , , , , , | Leave a comment

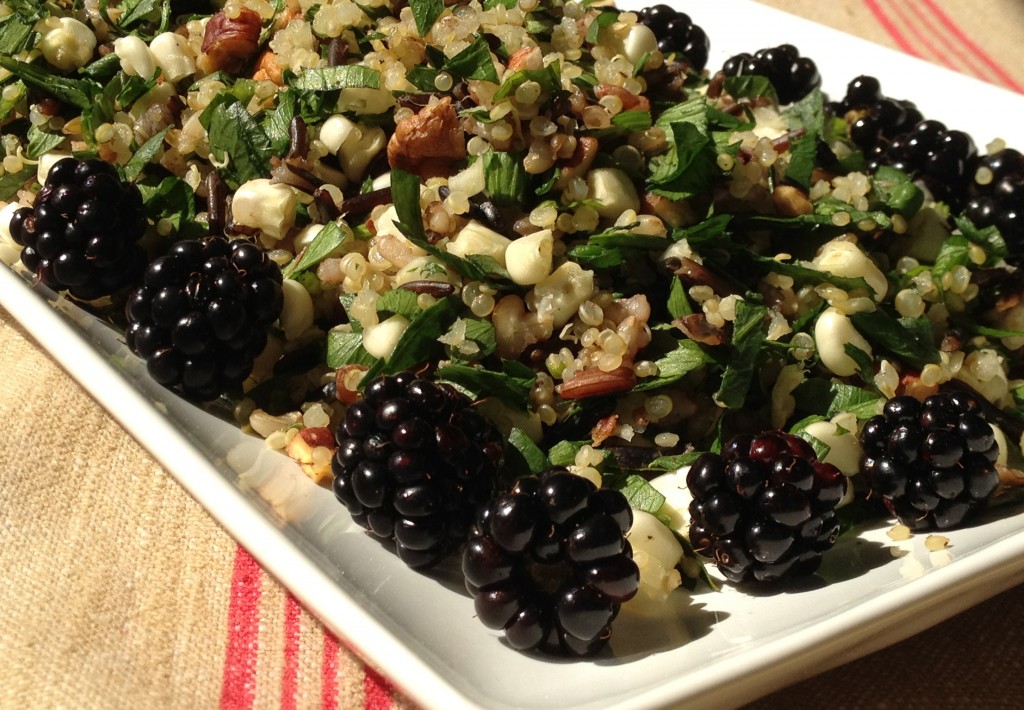
Quinoa Salad with Celery Leaf, Fresh Corn & Ripe Berries

Spring this year brought farms in the east a good amount of rain and the heirloom celery that we saw at the farmers’ markets was extraordinary this year compared to the last couple of years. No leaf damage, beautiful deep green color and no bugs. There was little to throw away and the flavor and texture of the leaves was lovely.

Normally we dehydrate all of these to use in soups and stocks throughout the year. But it was hard to put all of these beautiful leaves into the dehydrator so I wanted to try to find a different use for some of them. I decided that using some of the toasted quinoa and wild rice that I had on hand along with some fresh sweet corn might work as a quick salad. It’s great with some green onion and since there were raspberries, blackberries and blueberries in the house, I decided to try each in the salad. I liked the blackberries and blueberries the best. The raspberries were the most colorful, but I didn’t find them to be the best compliment to the other flavors and they tended to break apart quite easily. So use them sparingly for color if you like them, but rely on the other two berries for the bulk of flavor. This recipe will easily provide 4-6 side servings to a meal.


Quinoa Salad with Celery Leaf, Fresh Corn & Ripe Berries

Ingredients

  • 1/2 cup cooked wild black rice
  • 1/2 cup mixed wild rice blend (Lundberg)
  • 1/2 – 1 cup cooked quinoa
  • 2 teaspoons olive oil
  • 4 cups finely chopped or julienne cut celery leaves
  • 2 ears fresh corn (about 3/4-1 cup of cut corn)
  • 1/4 cup chopped toasted pecans
  • 1/2 cup fresh blackberries or blueberries
  • Chardonnay Oak Barrel Smoked Salt
  • Mixed Black Peppercorns

Preparation

  • Blend the quinoa with 2 teaspoons olive oil and spread out on parchment paper on a baking sheet with edges. Bake at 350F until the quinoa is toasted, about 20-30 minutes. It will darken a little as it toasts. It is easy to burn it so don’t take it too dark brown. Set aside to cool.
  • Place the pecan halves on the same baking sheet and toast for 5-7 minutes without burning. Set aside
  • Cut the corn off of the cob and set aside.
  • Mix the quinoa,  rice and pecans together in a bowl. Add the chopped celery leaves and corn. Toss to blend and add enough salt & pepper to suit your taste. Add the berries and gently toss. Serve chilled or at room temperature.

Notes

If you want to stop before adding the berries you can add a white balsamic & lime or a white balsamic & mustard dressing. Or use a balsamic dressing made with raspberry, blackberry or blueberry and maple syrup or honey as your sweetening agent.


Posted in Diabetic Friendly, Recipes, Salads, Seasonal Eating, Summer, Vegetarian | Tagged , , , , , , , , , , , , , , , , , , , , | Leave a comment

Seasonal Corn Madeleines with Fresh Herbs & Chili

I’ve really enjoyed my mini Madeleine pan since I bought it a few weeks back at Williams-Sonoma. It makes  bite-size treats that can be savory or sweet and the recipes are easy enough to pull together in a matter of minutes. This seasonal recipe includes sweet local corn, green onions and garden herbs along with Savory Spice Shop’s Piment d’Espelette Grey Sea Salt. You could seriously consider adding either goat cheese or cow’s cheese to these as well. And if you are prone to freezing the seasonal harvest, you can lightly blanch your corn and use it all year-long in this recipe.

Remember to butter your molds in the pan really well and let the Madeleine’s sit for a couple of minutes when they come out of the oven before popping them out of the molds. I find that using a glove and my finger works as well as any brush to smear a dab of melted butter into the mold before I fill it. And to remove them, I prefer to use a small silicone spatula.

This batter rises about 50% higher than you fill, so use a scant teaspoon so it stays in the mold as it’s baking.


Seasonal Corn Madeleines with Fresh Herbs & Chilli

Ingredients

  • 1/3 cup yellow organic finely milled corn meal
  • 2 tablespoons organic coconut flour
  • 1/2 teaspoon organic cane sugar
  • 1/4 teaspoon aluminum free baking powder
  • 1/2 teaspoon Piment d’Espelette Grey Sea Salt
  • 1/8-1/4 teaspoon Piment d’Espelette Chilli Pepper
  • 1/8 teaspoon fresh ground pepper
  • 1 tablespoon melted & cooled unsalted butter (plus extra for pan)
  • 1 egg lightly beaten
  • 1/2 cup plus 1 tablespoon well shaken buttermilk (without xathum or gum gar)
  • 2/3 cup fresh corn cut off the ear (you can use up to a cup)
  • 1/2 – 1 teaspoon fresh chopped chives
  • 1/4 – 1/2  teaspoon very finely chopped green onion (optional)

Preparation

  • Preheat oven to 440F
  • Lightly coat each individual mold with melted butter.
  • Whisk the cornmeal, coconut flour, baking soda, salt, pepper, chilli pepper together in a bowl.
  • Lightly beat an egg in a separate bowl and add the buttermilk and 1 tablespoon melted (slightly cooled) butter, beating by hand until well blended.
  • Add the dry ingredients to the wet and using a spatula, blend until it’s just combined and add in the corn, green onion, chives, working quickly to incorporate.
  • Spoon 1 teaspoon of batter into the molds and bake for 7-10 minutes until they spring back slightly when you touch them in the center. They will be firm around the edges and golden colored as you look at them, but not browned.
  • Serve warm or at room temperature.

Notes

  • Replace the green onion and chives with 1/4 teaspoon each of fresh chopped thyme & rosemary which grow nearly year round in the South.
  • Double the sugar for a sweeter version of the recipe.


Posted in Appetizer, Freezing & Canning, Gluten-Free, Recipes, Seasonal Eating, Second Harvest, Sides, Snack, Summer, Vegetarian, Year-Round | Tagged , , , , , , , , , , , , , , , , , , , , | Leave a comment

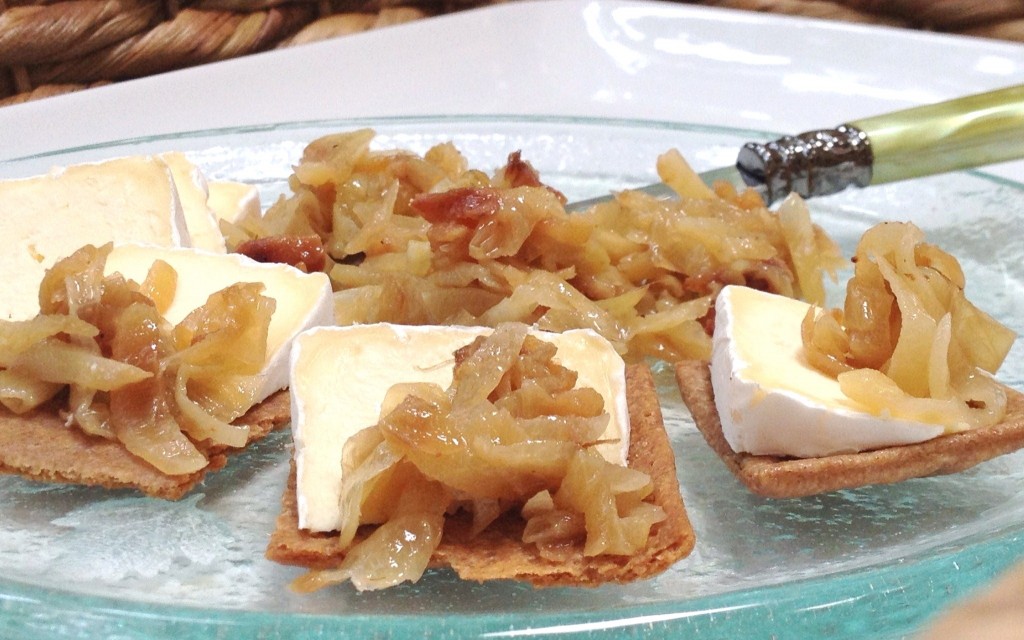
Slow Cooked Fennel Bulb & Sweet Onions

While I’m a fan of licorice, I can’t say that I know many people who are, especially in my family. So you can imagine the noises and faces that were presented when I came home with a half-dozen fennel bulbs and substantially more in onions. In the end, I had one convert, but that’s not to say you shouldn’t try this. If you don’t absolutely hate licorice, this is a recipe that might change your mind about cooking with it. The licorice flavor all but disappears in my mind as the onion and fennel give way to a delectable golden brown color of rich sweetness. Honestly, I can eat this stuff plain with a fork right from the pan.

One thing to note when you go to make this is that the recipe calls for “wet” sweet onions. The term refers to the way that the farms harvest onions. When they are first pulled from the ground they have a lot of water in them and they have not been “cured” outside in the sun to dry them out. They are delicate and they will rot if you hold them too long. So the farms start to cure them so they can continue to bring them to the market. What really works well about the “wet” onions is that the moisture content is so high it allows you to really slow cook these without adding a lot of oil or worrying about burning them. So opt for the wet onions on this recipe if you can still get them. They tend to go out about the same time as the fennel bulb begins to bolt.

Going in search of something to pair the final recipe with was a challenge. There are not many sustainable farms making  chicken sausage and that’s what this is really good on. I found Rainbow Meadows Farm at the NC State Farmers Market and picked up a package of the Italian spice chicken sausage.  Get yourself a  lovely local hot dog bun and you’re set for a late spring Sunday afternoon dinner or and early supper.

This is a super simple recipe and one we’re going to make at the market this week. What I love about this one is that it freezes so you can make up a bunch and have it for months. I think this would be really good with sausage served over German spaetzle with a bit of sauce created by adding a touch of cream at the end or after you pull it from the freezer. It also lends itself to a grilled sandwich with some cheese like Chapel Hill Creamery’s Hickory Grove with the leftover cooked sausage being sliced on a diagonal  or using some pulled chicken with fresh herbs like thyme and rosemary. And for an easy appetizer, just slice up some New Moon from Chapel Hill and place it on a cracker or baguette with the roasted fennel. You may need to add a bit of salt to this one because in other situations, the sausage and chicken spices provide some salt, but depending on the cracker or baguette, you’ll need to add  a touch.


Slow Cooked Fennel Bulb & Sweet Onions

Ingredients

  • 4 cups thinly sliced fennel bulb
  • 4 cups thinly sliced “wet” sweet onions (Candy variety works well)
  • 2 tablespoons olive oil
  • Chardonnay Oak Barrel Smoked Salt
  • Mixed peppercorn blend
  • 1 tablespoon local unsalted butter

Preparation

  • Heat a Using a stainless flat bottom casserole type pan on medium heat until warm and add olive oil and butter to melt.
  • Once melted, spread the sliced fennel and onions in a single layer across the pan and toss to coat with oil and butter.
  • Cover and keep the mixture cooking at medium to low, stirring occasionally to keep from burning. The onions should provide enough water for the mixture. If it starts to stick or cook too quickly, reduce the heat to low. The goal is to slowly cook this over a 45 minute period. Too fast and the fennel won’t soften enough and the onion will turn bitter instead of sweeter.

Notes

  • To make a sauce for noodles with chicken, add some cream at the end and blend well. Then add pieces of pre-cooked chicken and blend until the chicken absorbs some of the sauce.
  • Works well on top of Chicken Sausage with Italian type spices or paired with a young soft brie
  • Mix into goat cheese and add some fresh thyme or rosemary chopped fine along with a little salt & pepper for a super fast appetizer
  • Use on a grilled cheese sandwich along with some fresh chopped cabbage on local bread.
  • Will freeze for you to use later or travel with it.


Posted in Appetizer, Dairy-Free, Freezing & Canning, Gluten-Free, Nut-Free, Recipes, Seasonal Eating, Snack, Spring, Vegetarian | Tagged , , , , , , , , , , , , , , , , , | Leave a comment

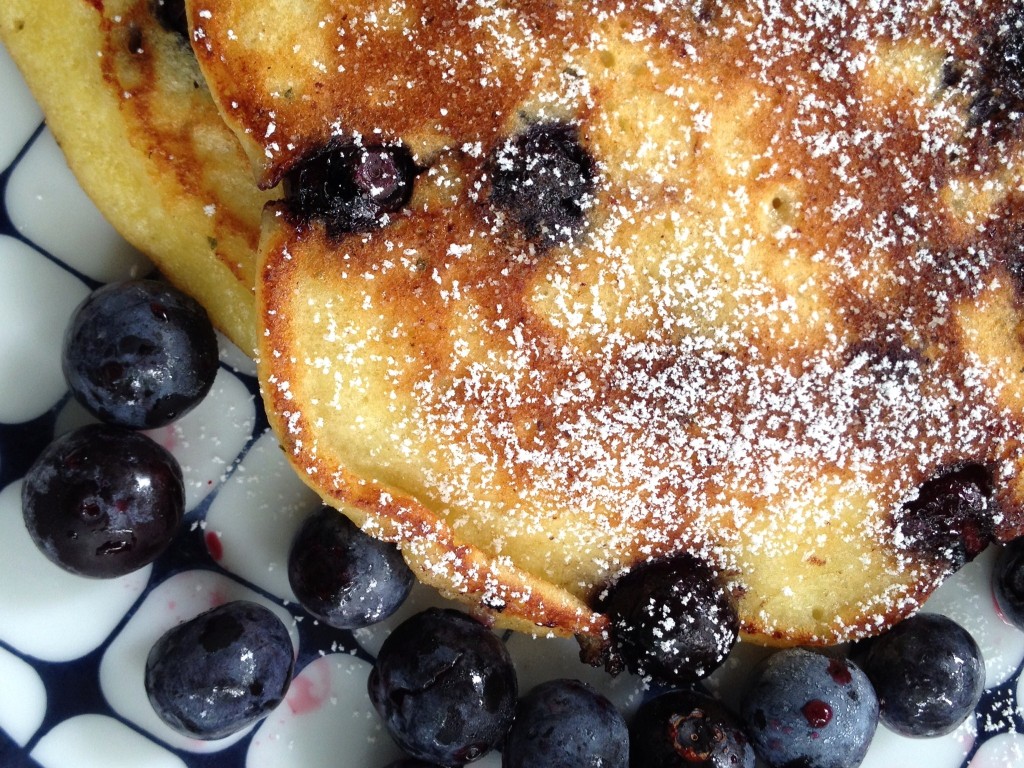
Blueberry, Lemon Verbena & Ricotta Pancakes

We’re rolling into June and while strawberries seemed like an appropriate fruit to highlight for Mother’s Day in delicate cookies, blueberries seem like a Father’s Day fruit to me and what better breakfast could there be for Dad than pancakes?

I’ve made ricotta pancakes before and while I love the creamy texture that the ricotta adds, I have to admit they are not as much of a favorite in the house as my standard Buttermilk Pancakes. But these are a little different with the use of yogurt instead of buttermilk. And while we’re on the subject of buttermilk, just a word of caution. I use local dairy products except in the case of buttermilk. The closest dairies to me use gum-gar and other additives to the buttermilk which produces an off-flavor and a sticky texture to the pancakes. So I use Organic Valley brand buttermilk when I need it, or I make my own with some vinegar or just add a little yogurt for the tangy taste. Any of the three work just fine.

This recipe makes a small batch, good enough for 2-3 people. Don’t be tempted to make big pancakes. The ricotta makes a delicate creamy pancake which doesn’t cook evenly or flip well when you make it huge. Stick to a 4″ diameter or smaller and you’ll have no problems at all. I have used both a Le Creuset Non-stick 8″ skillet as well as a small cast iron skillet, both on low once they are heated. Butter in the bottom of the pan, just a little goes a long way. The pancakes will release nicely when they are cooked through on the first side, before the flip.

Trying to make these a totally local item, I’ve used Calico Farmstead Cheese whole fat ricotta, local honey (I have 5 local apiaries in the cabinet at the moment), lemon verbena leaf to replace lemon zest, local butter & milk, sustainable blueberries that I picked in Chatham County, eggs from a local organic pasture farm, and Lindley Mills organic flour. We sell the ricotta honey & lemon  blended cheese through the company in small quantities if you want some for this recipe or for your french toast sometime.


Blueberry, Lemon Verbena & Ricotta Pancakes

Ingredients

  • 1 cup fresh whole-milk ricotta cheese
  • 2-3 teaspoons honey
  • 2 small lemon verbena leaves, finely chopped (substitute 1 teaspoon finely grated lemon zest)
  • 1/3 cup plain Greek organic yogurt
  • 2 med-large eggs, separated
  • 3/4 cup organic all-purpose flour
  • 1 1/2  teaspoons baking powder
  • 1/4 teaspoon salt
  • 1/4 teaspoon baking soda
  • 3/4 cup whole or low-fat milk
  • 12 oz thawed or fresh whole blueberries

Preparation

  • Blend the ricotta, honey & lemon verbena together.
  • Add the yogurt to the ricotta mixture.
  • Separate egg yolks and whites. Add the egg yolks to the ricotta & yogurt. Whisk to blend well.
  • Add the milk to the ricotta mix and blend well.
  • Add whites to small bowl and whisk until small peaks form. A balloon whisk works well. Set aside.
  •  In another bowl whisk flour, baking powder, salt and baking soda.
  • Add flour mixture to yolk mixture and stir until combined.
  • Gently fold in the stiff egg whites to the batter until barely combined.
  • With a warm griddle coated with a little butter, pour about a 4″ diameter pancake and gently drop blueberries into the pancake. If you push them through to the bottom of the pan, they will show through both sides, otherwise they will only show through one side.
  • Cook on low-medium heat until small bubbles start to form and the cooking side has turned a golden brown color.
  • Flip when the pancake is firm enough to hold together without spilling (it will be about 3/4 of the way cooked through). Finish cooking until golden and serve with honey butter or maple syrup.


Posted in Breakfast, Recipes, Seasonal Eating, Second Harvest, Spring, Year-Round | Tagged , , , , , , , , , , , , , , , , , , , , , , , , , , | Leave a comment

Salads, Soups & Stir Fry, OH MY!

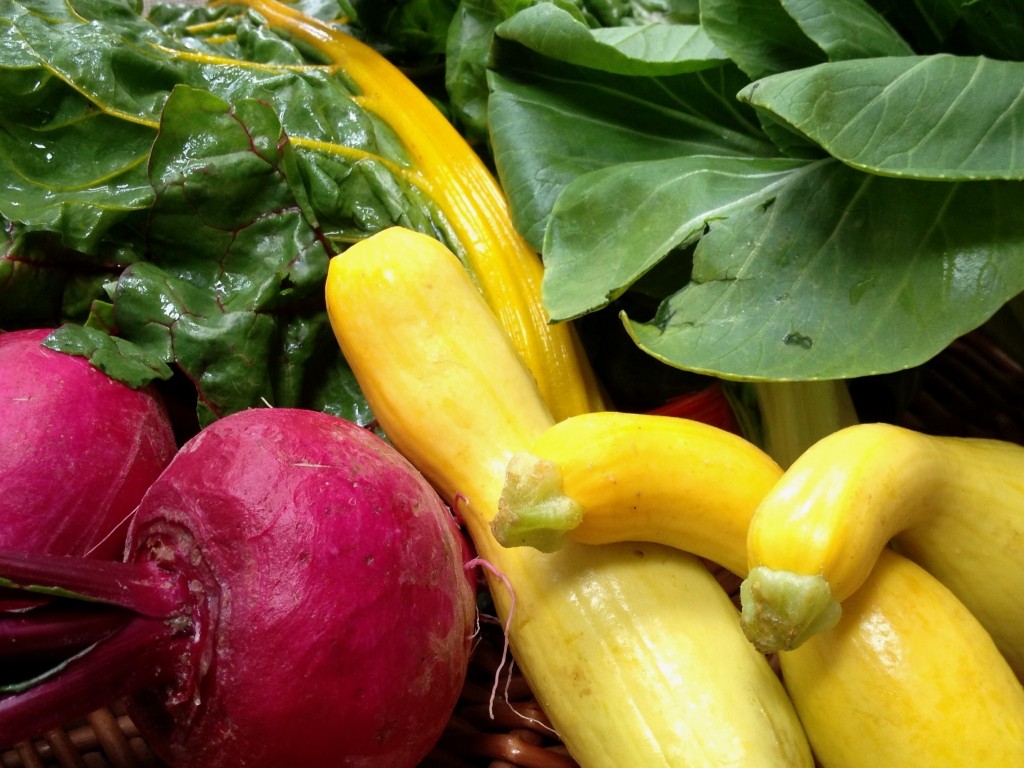
Despite the longer days, it seems like there is less time to cook. Maybe it’s just the increase in outdoor activities, but I wanted to share a strategy with you that I use frequently after shopping at one of our local farmers’ markets. It’s called 3 in 1. Basically the idea is to prep your fresh veggies one time for 3 meals. This is more creative than it sounds because you are basically shopping for items that might taste good together in three different dishes as a whole, but that doesn’t exclude the odd item here or there that would make a recipe really pop for you in just one recipe.

The Base Layer provides the undertones.  Not too bitter, not too sweet – greens, cabbage, onions, garlic.

The Second Layer includes veggies that do the hard work of filling you up and providing color and texture to your meal – squash, carrots, zucchini, turnips, sweet potatoes, radishes.

The Third Layer provides protein and it doesn’t have to be large. I still use the palm of my hand rule. quinoa, nuts, meat, hard-boiled egg, tofu.

The Fourth Layer makes your recipe pop in contrast or compliment to your other ingredients. It can be ginger, mushrooms, pickled vegetables, pea shoots, a bit of sauce, chutney, or special salt or salted item. Look for something that makes your dish look and taste just the way you would want it if you were eating out. You won’t need a lot, it doesn’t have to be expensive. You are trying to create a bit of contrast to other flavors or the technique you used to “cook” your meal or something that enhances one or two of your other items in a way that no other flavor can do.

Once you have that here’s the drill:

The greens get washed and dried. The veggies are scrubbed and prepped for slicing. Eggs get pulled out to boil. Nuts get pulled out to toast.

Decide on other  “add-in” elements from the pantry and  freezer, whether that’s pasta, quinoa,  kelp noodles, chicken, cheese or roasted vegetables from another season. Pull those out as well to cook or thaw.

Pull  home-made stock and let it thaw in the refrigerator as well.

Slice or tear your greens (chard, spinach, bok choi, Napa cabbage, purple or red cabbage, kale) and put in a sealed container. Generally I select 3 types of greens that have different colors and mix them together in equal amounts,  laying a paper towel on the top so that it can absorb extra water in the container.

Then slice or dice any other vegetables like carrots, broccoli, cauliflower, the stems of the bok choi, turnips,radishes, zucchini, and squash. Set those into a container together or separated depending on what you intend to make on day 2 & 3. My exception to this plan is for mushrooms and ginger (in season). I don’t clean and slice them until the day I am going to use them. Again, I try to use equal amounts of the vegetables and keep it colorful, selecting nice compliments or contrasts. You might consider keeping the vegetables separate.

The eggs are boiled and put back into the fridge. The nuts get toasted in a toaster oven on parchment paper and sealed in a glass container. Quinoa, pasta, or rice is made and put back into the fridge.
Salads, Soup & Stir Fry

Ingredients

  • 2-3 cups of shredded greens per person
  • 2 cups of sliced or chopped vegetables per person (1/2 cup of each vegetable per person)
  • 1/2-1 cup protein per person (7-10 grams per person as base)
  • Something fun that accents your vegetables like ginger, nuts, coconut
  • 4-8 cups of broth for soup
  • 1/2-1 cup soy sauce or something similar (broth with a little soy) for stir fry
  • Oil of your choice for the stir fry that will take the high heat without burning

 Preparation

The salad is the easiest. Make it colorful with textures and flavors. Select a dressing. Generally I mix 2-4 ingredients for a simple oil & vinegar dressing. Sometimes I make a milk based herb dressing that will keep a couple of days.

For the soup, get your stock up to a boil point and drop in the veggies that take the longest to cook. This is where organization and prep take the work out of a meal. As the minutes pass, drop the next couple of vegetables into your stock. When there is just a minute or two left to cook, drop in your protein, shredded greens and quinoa, pasta or rice just to heat it through. Season to taste and serve. Yes, it’s really that simple.

For the stir-fry you will use the same technique. Depending on how you reheat your rice quinoa or other base, get that ready to go. You can use a steamer, microwave or stir fry technique. Then get your pan hot (I use stainless for this) and add a bit of oil (I use olive oil pretty much all of the time). Quickly add the longest cooking veggies like the stalks of the chard, celery or bok choy. Then all your colorful veggies again starting with what needs the longest to cook. Keep the pan hot but not scorching. Things should not be burning and smoke should not be coming up from the pan. When you are finished with the veggies, add your protein and then add your greens. As the greens just begin to wilt, you can add some stock or soy sauce or other flavoring that will provide some sauce for your dish when you put it over the rice, noodles or quinoa. If you need to thicken the sauce, you might try arrow-root which needs to be added like most starches to a cold ingredient. Your flavoring stock or soy sauce or just a little water will work for that. Mix it in well and add it so you have about 2 minutes to cook it to a rapid boil, which will initiate the thickening process. This whole process generally takes less than 15 minutes from start to finish and kids can help a lot with this one by adding in the ingredients for you at the right time.

If you have anything left after day three, put it into an omelette for breakfast, add some cheese and enjoy!


Posted in Appetizer, Diabetic Friendly, Gluten-Free, Recipes, Salads, Vegetarian, Year-Round | Tagged , , , , , , , , , , , , , , , , , | 1 Comment